Imagine: you’re scrolling through Instagram or TikTok when something captivating stops you in your tracks a stunning set of nails shimmering like a galaxy, each one reflecting light with a sleek, velvety stripe. The effect is mesmerizing, almost magical. It’s cat eye gel polish and suddenly, you need it.
But instead of spending $60 at a salon (plus tip, plus the awkward small talk), you’re thinking: Could I do this myself? At home? Like a nail wizard? The answer is yes. 100% yes.
Welcome to your ultimate beginner’s guide on how to use cat eye gel polish at home, where we break down every step, tip, and trick to help you achieve stunning results even if your nail art journey starts with “What’s a cuticle?”
Whether you’re a DIY diva, a self-care queen, or someone who wants a little sparkle between grocery runs, this guide is your new mani bestie.
Contents
- 1 What Is Cat Eye Gel Polish Anyway?
- 2 Must-Have Tools for Cat Eye Gel Polish at Home
- 3 Step-by-Step: How to Use Cat Eye Gel Polish Like a Pro
- 4 How to Remove Cat Eye Gel Polish Without Ruining Your Nails
- 5 Cat Eye Nail Trends You Should Try
- 6 Budget + Sustainability Tips (Because We Love Smart Glam)
- 7 FAQs: Your Burning Cat Eye Questions, Answered
- 8 Experts Thoughts: Channel Your Inner Nail Artist
- 9 About the Author
What Is Cat Eye Gel Polish Anyway?
Let’s break it down: cat eye gel polish is a magnetic gel polish that contains teeny-tiny metallic particles. When exposed to a magnet, these particles shift and align in a way that mimics the reflection you see in a cat’s eye hence the name. The result? A 3D, shimmering effect that looks almost otherworldly.
Why You’ll Fall in Love With It:
- Visually stunning. The shifting shimmer is always in motion.
- Trendy. Celebs, influencers, and nail techs are all obsessed.
- Budget-friendly. DIY saves a significant amount of money compared to salon visits.
- Long-lasting. With proper prep, it lasts 2–3 weeks.
- Sustainable options. Cruelty-free, 5-free formulas now exist!
Must-Have Tools for Cat Eye Gel Polish at Home
Before we dive into how to use cat eye gel polish, make sure you have these essentials on hand:
Your DIY Nail Arsenal:
- Cat Eye Gel Polish (look for beginner kits with magnet included)
- Gel Base Coat and Top Coat
- UV/LED Lamp (preferably 48W+ for fast curing)
- Magnet Wand (flat or dual-ended)
- Nail File & Buffer
- Cuticle Pusher
- Lint-Free Wipes
- Rubbing Alcohol or Gel Cleanser
Pro Tip: Want to avoid buying everything separately? Many starter kits on Amazon include everything above (even polish, lamp, and wand!) for under $30 a great deal!
Step-by-Step: How to Use Cat Eye Gel Polish Like a Pro
Grab your tools, clear a space, and get ready to feel like a nail tech goddess.
Step 1: Nail Prep is Queen
Even the best polish won’t stick if your nails aren’t prepped. Take 10 minutes for:
- Removing old polish
- Filing nails to your desired shape
- Pushing back your cuticles
- Buffing the nail surface lightly
- Wiping down with rubbing alcohol to eliminate oils
This step is your foundation. Skip it, and your manicure may chip before your coffee’s cold.
Step 2: Base Coat Magic
Carefully apply a thin, even layer of gel base coat on each nail, ensuring the entire surface is covered surface for a smooth, lasting finish. Cure it under your lamp (usually 30–60 seconds, depending on the wattage of your lamp).
This locks in your prep and gets your nails ready to party.
Read More: Does Facial Cleanser Expire? Avoid These Mistakes
Step 3: First Coat of Cat Eye Polish
Now, the moment you’ve been waiting for! Apply a thin, even layer of your cat eye gel polish.
Important: Don’t use the magnet yet. Cure this first coat to set the colour base.
Step 4: Add the Second Coat and Magnetize
This is where the magic happens:
- Apply a second layer of the cat eye gel polish, but do not cure yet.
- Grab your magnet wand.
- Hold it just above the nail (¼ inch) for 10–15 seconds.
- Watch the shimmer shift into a glowing, velvet-like streak.
Once you’re happy with the design cure immediately to freeze the pattern in place.
Style Tips:
- Vertical streak: Classic cat eye.
- Diagonal: Sleek and chic.
- Wavy or curved: Add mystery.
- Try tilting the magnet for multi-dimensional effects.
Step 5: Optional Second Layer (If You’re Feeling Fancy)
Want extra depth or more shimmer? Apply another coat and repeat the magnet trick.
Just remember: cure between each coat to lock everything in.
Step 6: Seal with Top Coat
To finish, apply your gel top coat, cure it, and then wipe off the sticky residue with alcohol.
Boom. You just mastered how to use cat eye gel polish from base to brilliance.
How to Remove Cat Eye Gel Polish Without Ruining Your Nails
Please don’t peel it. Seriously. Your nails will thank you.
Instead, follow the proper gel removal steps:
- File the top coat to break the seal.
- Soak cotton pads in acetone & place them on each nail.
- Wrap in foil or clip with nail caps.
- Wait 10–15 minutes.
- Gently scrape off the softened gel.
Apply cuticle oil and a nourishing nail strengthener afterwards. Self-care never stops.
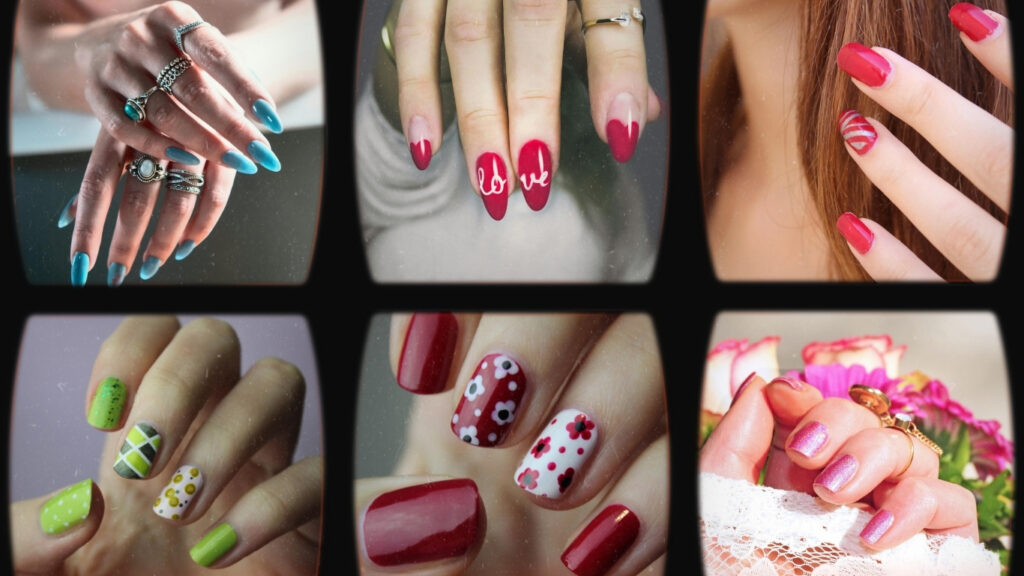
Cat Eye Nail Trends You Should Try
If you want your nails to be Instagram-ready, here are a few trends worth trying:
- Velvet Cat Eye: Super soft, luxe finish think crushed velvet.
- Holographic Cat Eye: Adds a prismatic twist.
- Chrome Cat Eye: A futuristic, mirrored vibe.
- French Cat Eye: Use the magnetic polish just on the tips!
- Two-Tone Magnet Mix: Use multiple colours to create an ombré effect.
Look for vegan, cruelty-free, and “5-free” polish brands that avoid harmful chemicals like formaldehyde and DBP.
Budget + Sustainability Tips (Because We Love Smart Glam)
Getting glam doesn’t have to cost a fortune or the planet.
Here’s how to be a beauty boss on a budget:
- Buy reusable gel kits with everything included
- Choose rechargeable or lower-energy LED lamps
- Opt for eco-friendly polish brands like Modelones or AIMEILI
- Use washable nail brushes instead of disposable tools
And hey doing your nails means fewer plastic salon tools and less driving. Win-win!
Read More: How to Use Diffuser Hair Dryer
FAQs: Your Burning Cat Eye Questions, Answered
1. Can I use a fridge magnet instead of the wand?
Technically yes, but it’s not strong or precise enough. Wand magnets are designed for the exact shimmer movement you want.
2. Does it work on natural nails?
Absolutely! Just prep properly, use a gel base or top coat, and you’re good to go.
3. Can I reposition the shimmer after it has cured?
Nope, once cured, it’s set. You’d need to reapply a fresh layer and use the magnet again.
4. Is it beginner-friendly or better for pros?
Perfect for beginners take your time, follow each step, and don’t rush the magnet part!
5. How long does cat eye polish last?
With proper application, you can expect 2–3 weeks of chip-free, sparkle-packed nails.
Experts Thoughts: Channel Your Inner Nail Artist
Learning how to use cat eye gel polish at home is like discovering a mini superpower. You can switch up your style, match your nails to your mood, and save serious cash all without leaving your house.
So light a candle, throw on a playlist, and give yourself a mani that’ll turn heads (and probably earn a few DMs). You’ve got this, sparkle queen.