How to bleed brakes with vacuum pump might not be common Sunday morning knowledge, but if you’ve ever felt your brake pedal go from firm to frighteningly squishy, it’s something you’ll want to learn, fast.
It started as a regular Sunday maintenance session. You know the kind garage door up, coffee in hand, and that perfect playlist echoing through the driveway. But then, the brake pedal betrays you. Instead of that reassuring firmness, you’re greeted with a spongy, nerve-wracking sink. That moment? Your car says, “Hey buddy, there’s air in the brake lines.”
Whether you’re a first-time DIYer or just tired of booking shop appointments for every tiny fix, learning this simple process can save you time, money, and anxiety when it’s time to stop at a red light.
This guide will walk you through the whole process no confusing jargon, just clear, wrench-ready wisdom.
Let’s turn that sponge pedal into the smooth stopping power your car (and your nerves) deserve.
Contents
- 1 Tools and Materials You’ll Need
- 1.1 Why Bleeding Brakes Is Non-Negotiable
- 1.2 Step 1: Prep Your Workspace and Vehicle
- 1.3 Step 2: Jack Up the Car Safely
- 1.4 Step 3: Attach the Vacuum Pump
- 1.5 Step 4: Pull the Vacuum and Open the Valve
- 1.6 Step 5: Keep an Eye on the Master Cylinder
- 1.7 Step 6: Wait for Clean, Bubble-Free Fluid
- 1.8 Step 7: Dispose of Brake Fluid Properly
- 1.9 Step 8: Test the Pedal and Drive Safely
- 1.10 Recommended Beginner-Friendly Tools
- 1.11 FAQs: How to Bleed Brakes with a Vacuum Pump
- 1.12 Expert Thoughts: DIY That Feels Empowering
- 1.13 About the Author
Tools and Materials You’ll Need
Before diving into the steps, gather your gear. The right tools make all the difference especially when dealing with something as critical as brakes.
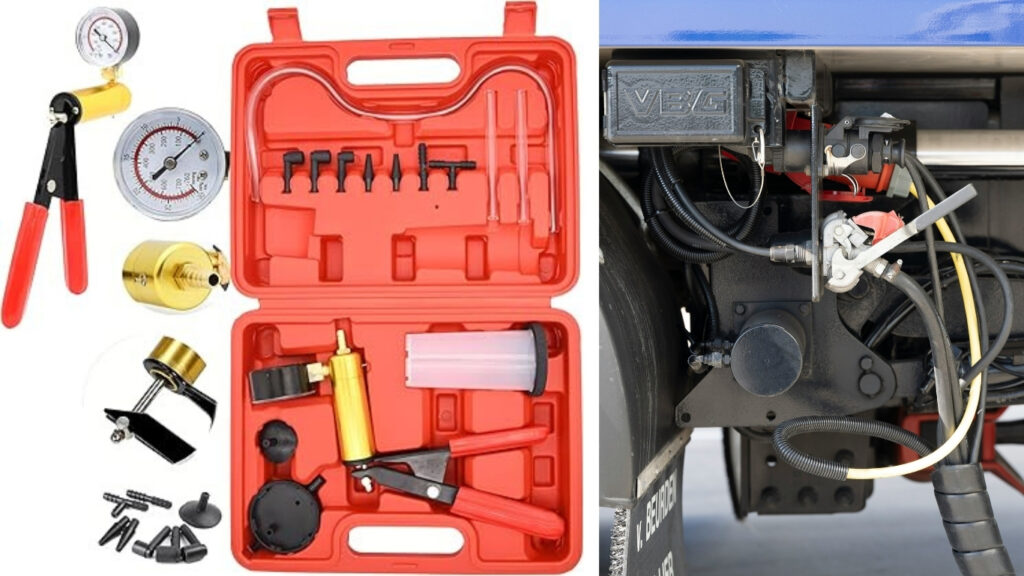
Must-Have Equipment:
- Vacuum Brake Bleeder Kit (manual hand pump or pneumatic style)
- Correct Brake Fluid (Check your owner’s manual usually DOT 3, DOT 4, or DOT 5.1)
- Catch Bottle with Clear Tubing
- Line Wrench or Box Wrench (to loosen bleeder valves safely)
- Disposable Gloves and Eye Protection
- Clean Rags or Towels (for spills and cleanup)
- Jack and Jack Stands (NEVER work under a jacked-up car without stands)
- Torque Wrench (for retightening wheel lugs)
Tip: Place an old towel or baking tray under the work area to catch drips. Brake fluid is corrosive it’ll eat through paint faster than you can say, “Oops.”
Why Bleeding Brakes Is Non-Negotiable
Braking isn’t a maybe it’s a must. And if there’s air in the hydraulic lines, your pedal can go soft, making stopping dangerous or even impossible. Unlike brake fluid, air compresses under pressure. That means less braking power and more risk.
Learning how to bleed brakes with a vacuum pump isn’t just a mechanical flex it’s a safety essential.
Reasons you may need to bleed:
- The brake pedal feels soft or spongy
- You recently changed callipers, pads, or fluid
- The fluid looks dirty or discoloured
- Routine maintenance (every 2–3 years is ideal)
Step 1: Prep Your Workspace and Vehicle
Choose a flat, well-lit workspace. Block the wheels with chocks, engage the parking brake, and pop the hood. Look for the brake fluid reservoir beneath the hood it’s most often tucked near the driver’s side firewall, close to the windshield.
- Wipe around the reservoir cap to prevent dirt or debris from getting inside.
- Open the cap and check the fluid level.
- Top off with new brake fluid as needed. (Never reuse old or opened fluid.)
Tip: Always use fluid from a freshly sealed bottle. Brake fluid is hygroscopic it absorbs moisture from the air and degrades quickly once opened.
Step 2: Jack Up the Car Safely
Use a hydraulic floor jack to lift your vehicle and secure it with jack stands one at each corner you’ll work on. Never rely on Jack alone.
Follow the correct bleeding sequence. For most vehicles, that’s:
➡ Right Rear → Left Rear → Right Front → Left Front
Start with the calliper farthest from the master cylinder and work your way forward.
Step 3: Attach the Vacuum Pump
Now, the magic begins.
- Locate the bleeder valve on the calliper or wheel cylinder.
- Remove the rubber cap and fit your clear tubing over the nipple.
- Connect the other end of the tubing to your vacuum pump and collection bottle.
Ensure it’s airtight. A loose fit means no vacuum and no progress.
Read More: How to Use a Vacuum Brake Bleeder: A Guide for Beginners
Step 4: Pull the Vacuum and Open the Valve
With your connections secure:
- Begin pumping the vacuum. Aim for around 15–20 inHg of pressure on the gauge.
- While maintaining suction, use a wrench to loosen the bleeder valve (usually, ¼ turn is enough).
Fluid and air will flow through the tubing into the catch bottle. Watch for bubbles that’s the air escaping the lines.
Step 5: Keep an Eye on the Master Cylinder
This step is crucial. Never let the master cylinder reservoir run dry. Doing so can reintroduce air into the brake system and undo all your hard work.
- Check the fluid after every wheel.
- Top off with fresh brake fluid as needed.
Use only what your vehicle requires (DOT 3, 4, or 5.1 do not mix types).
Step 6: Wait for Clean, Bubble-Free Fluid
As fluid flows through the system:
- Watch the tubing for bubbles and discolouration.
- Once you see clear, bubble-free fluid, tighten the bleeder valve.
- Remove the tubing and wipe down the area.
- Replace the dust cap.
Repeat this process for all four wheels.
Tip: Don’t rush. Pulling fluid too quickly can cause turbulence and pull air around the threads. Steady, slow pumps win the race here.
Step 7: Dispose of Brake Fluid Properly
Old brake fluid isn’t just useless it’s toxic. Never dump it down a drain or toss it in the trash.
Environmentally Safe Disposal Options:
- Take it to an auto parts store with a recycling program
- Visit a hazardous waste facility in your area
- Attend community disposal days (usually free!)
Going the sustainable route keeps our groundwater safe and your conscience clean.
Step 8: Test the Pedal and Drive Safely
Once all wheels are bled:
- Pump the brake pedal until it feels firm usually 3–5 times.
- Check for leaks around bleeder valves and fittings.
- Lower the vehicle and retighten lug nuts using a torque wrench.
- Take a slow test drive, gradually increasing brake pressure to verify success.
Your pedal should feel tight and responsive, with no sponginess or delay.
Mission accomplished!
Recommended Beginner-Friendly Tools
Here are a few trusted tools to consider adding to your garage:
- Mityvac MV8000 Vacuum Pump Kit – Great manual option for first-timers
- OEMTOOLS Pneumatic Brake Bleeder – For those with access to compressed air
- Prestone DOT 4 Brake Fluid – Affordable and reliable for most modern vehicles
- Powerbuilt 3-Ton Jack Stands – Extra-wide base for stability
- Lisle Catch Bottle Kit – Reusable and leak-proof for mess-free bleeding
Look for combo kits that bundle pumps, bottles, hoses, and adapters all beginner-friendly and budget-conscious.
Read More: Why Is My Vacuum Not Sucking? 7 Common Causes and Fixes
FAQs: How to Bleed Brakes with a Vacuum Pump
1. Is it safe to bleed brakes by myself?
Absolutely! A vacuum pump allows solo bleeding. Just be sure to monitor fluid levels and work safely.
2. How often should I bleed my brakes?
Most automakers recommend every 2–3 years or whenever the fluid appears dark or after brake service.
3. What’s the difference between DOT 3 and DOT 4 fluid?
DOT 4 brake fluid features an elevated boiling point and takes in less moisture compared to other varieties. Always consult your owner’s manual before switching fluid types.
4. Why is my pedal still soft after bleeding?
You may have residual air in the system, a loose connection, or a failing master cylinder. Re-bleed and inspected components.
5. Can I reuse brake fluid from the catch bottle?
Never. Once exposed to air, brake fluid degrades and absorbs moisture making it unsafe for reuse.
Expert Thoughts: DIY That Feels Empowering
Bleeding brakes may sound like something better left to the pros, but learning how to bleed brakes with a vacuum pump puts you in control of one of your car’s most vital systems.
With a few tools, patience, and this step-by-step guide, you can replace uncertainty with confidence. Whether you save money or love the satisfaction of fixing things yourself, this DIY pays off every time you hit the brakes.
Go ahead, get your hands dirty. Your car (and your wallet) will thank you.