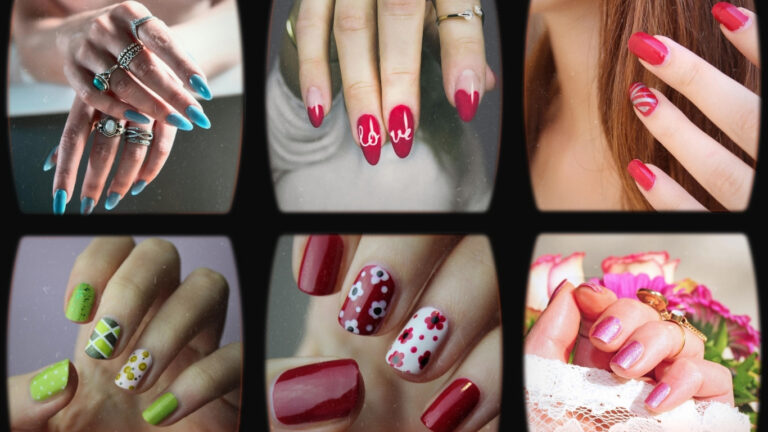
Let me take you back. I was deep in a TikTok rabbit hole, watching nail techs create literal galaxies on fingertips with nothing but a little bottle of polish and a magnet wand. At first, I thought, ‘That has to be a filter.’ But no it was real. And the more I saw of this hypnotic nail trend, the more obsessed I became.

That’s when I decided to try it myself no salon, no $75 appointment, just my two shaky hands and a dream.
If you’re anything like me a beauty DIY lover with a taste for affordable glam then you’re going to adore this look. In this tutorial, I’ll show you how to do cat eye gel polish at home, step-by-step, using beginner-friendly products and a sprinkle of patience.
Spoiler alert: You’re about to create nail art that looks like it cost a fortune for less than your last Target run.
Contents
What Is Cat Eye Gel Polish Anyway?
Picture this: a glossy, multidimensional manicure that shifts in the light like a feline’s eye-catching sun. The magic comes from magnetic pigments suspended in the gel polish. When you hover a special magnet over the wet polish, it pulls those particles into a gorgeous, shimmery line or a burst, wave, or halo if you get creative.
It’s futuristic. It’s dramatic. And guess what? It’s not just for pros.
What You Need to DIY Cat Eye Gel Nails at Home
Let’s get our nail kit together. Here’s your cat eye essentials checklist:
- Cat Eye Gel Polish (look for magnetic formulas)
- Base Coat & Top Coat (gel versions only!)
- UV or LED Nail Lamp
- Magnet Wand or Pen (these come in different shapes for fun effects)
- Nail File, Buffer, Cuticle Pusher
- Alcohol Wipes or Gel Cleanser
- Optional: Black Gel Polish (for next-level depth)
Pro Tip: Look for non-toxic, cruelty-free, or 5-free formulas to keep things clean and kind.
How to Do Cat Eye Gel Polish at Home: A Step-by-Step Guide
Step 1: Prepping Your Canvas
Great art starts with a great base and that includes your nails.
- Remove old polish (obvi).
- Shape your nails with a file (go oval, square, stiletto your nails, your rules).
- Gently push back your cuticles (don’t skip this step it helps the polish stay put).
- Buff the surface of each nail lightly.
- Wipe nails clean with alcohol to remove dust and oils.
A good prep session is like a primer for your nails. Don’t rush it, it makes everything last longer.
Step 2: Base Coat = Nail Armor
Apply a smooth, thin layer of gel base coat, being careful not to let it pool near your cuticles (trust us, that’s the fast lane to lifting). Once applied, cure it under your UV or LED lamp for approximately 30–60 seconds check your lamp’s specifications to ensure accuracy.
Read More: How to Use Cat Eye Gel Polish at Home: Beginner’s Guide
Step 3: Go Dark for the Drama (Totally Optional, Totally Worth It)
Want to take your cat eye to a whole new level of whoa? Apply a single, thin coat of black gel polish and cure it. This isn’t a must, but it turns up the intensity like mood lighting on date night.
Think of it as laying down a black velvet backdrop suddenly, those shimmering pigments glow like jewels.
Step 4: Apply Cat Eye Gel Polish + Magnet Magic
Here’s where the sparkle happens:
- Apply a thin coat of your cat eye gel polish to one nail.
- Do NOT cure it yet!
- Hover your magnet wand over the nail hold it close (1–3 mm above), but don’t touch the polish.
- Wait about 10 seconds as the shimmer shifts into a magical pattern.
- Once you’re happy with the look, cure immediately.
Repeat for each nail. Work one at a time to keep the polish fresh and responsive to the magnet.
Play with the magnet’s direction vertical lines, diagonal streaks, galaxy bursts the options are endless. Try holding it at an angle for a swirl or a French tip glow.
Step 5: Want More Sparkle? Add a Second Coat
Want that cat eye to pop like it just strutted off the runway? Apply a second coat of polish, work that magnet magic again, and cure it. The result? Extra depth, extra drama, and nails that steal the spotlight.
Step 6: Top It Off Like a Queen
Lock in your look with a no-wipe gel top coat smooth it on evenly, cure it completely, and get ready for serious shine.
Optional: After curing, gently buff the edges to smooth out any rough spots left by the top coat.
Step 7: Clean & Flaunt
If your top coat leaves a tacky residue, use an alcohol wipe to clean it up. And just like that you’ve got cat eye gel nails so stunning, they might purr.
Nail Art Ideas to Try with Cat Eye Gel
Want to elevate your DIY manicure game? Try these stunning variations:
- Galaxy Swirl: Move the magnet in a spiral motion
- Halo Glow: Hover the magnet over the centre only
- Accent Nails: Use cat eye polish on one or two nails per hand for contrast
- Reverse French: Cat eye glows near the cuticle instead of the tip
The creative possibilities are as endless as your nail polish stash.
Favorite Products Worth Trying (Softly Suggested)
We’re committed to keeping things budget-friendly and beginner-friendly. Here are some top-rated, affordable options:
- Born Pretty Cat Eye Polish – Amazing shade variety and easy application
- Modelones Non-Toxic Magnetic Gel Set – Clean beauty meets high shine
- Beetles Gel Polish Kit – Includes magnet + lamp if you’re starting fresh
- Makartt Mini LED Lamp – Affordable and compact
- Dual-Ended Magnet Wand – Lets you create swirls, stars, and more
All of these are available on Amazon or Etsy perfect for fast shipping and beauty experimentation.
Read More: How to Use Facial Cleanser in 5 Easy Steps
FAQs: How to Do Cat Eye Gel Polish at Home
1. Can I use a regular refrigerator magnet?
Not really. You need a special nail art magnet designed for this polish. Fridge magnets are too weak (and, let’s be real, too clunky).
2. What if the shimmer isn’t showing up?
Common causes:
- You cured it before using the magnet.
- Your polish layer was too thick or thin.
- You held the magnet too far away or not long enough.
3. Do I need a black base for it to work?
Not required but highly recommended. Black acts like a dramatic backdrop and lets the magnetic pigment shine.
4. How long will this mani last?
With proper prep and care, up to 3 weeks. Use gloves for cleaning and reapply a top coat mid-week for a bonus of shine and strength.
5. Is this safe for natural nails?
Absolutely! Just avoid over-buffing and always remove gel polish gently (soak, don’t peel!). Select non-toxic formulas for an added layer of care.
Experts Thoughts: Your Nails, Your Rules
Learning how to do cat eye gel polish at home isn’t just about saving money it’s about claiming your beauty routine as something fun, expressive, and yours. Whether you’re painting your nails on your lunch break, during a Netflix binge, or as a form of self-care, this trend is the perfect mix of glam and easy-to-master technique.
So go ahead grab that magnet, pick your favourite shade, and get ready to feel like a DIY nail goddess (or wizard, if that’s more your vibe).
You’ve got the tools. You’ve got the tutorial. Now get out there and sparkle like the starry feline queen you are.