Let me set the scene: You’re reaching for that one cereal box on the top shelf you know, the one hiding like it’s in the witness protection program. Or maybe your toddler wants to brush their teeth “all by myself!” but the sink is still Everest. What do these situations have in common? They both scream: “We need a stepping stool!”
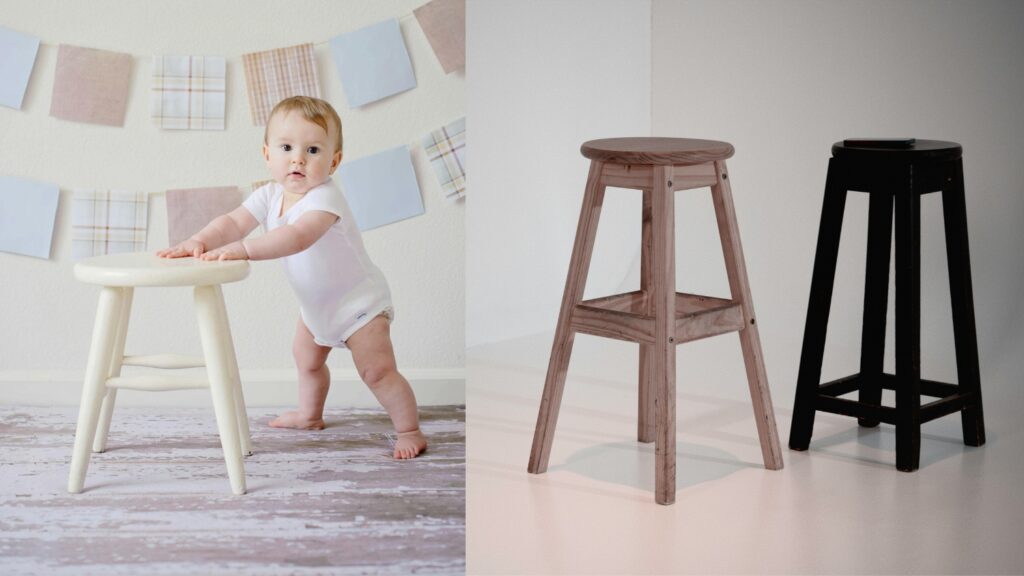
Whether you’re a parent, a DIY dabbler, or someone just tired of balancing on questionable chairs (we’ve all done it), learning how to make a stepping stool is one of those handy life upgrades you’ll never regret. Bonus? It’s budget-friendly, totally customizable, and surprisingly beginner-friendly.
Ready to build a safe, stylish, and space-saving slight step-up? Let’s get to it!
Contents
- 1 Why Make a Stepping Stool Yourself?
- 2 What You’ll Need (Materials & Tools)
- 3 Step-by-Step: How to Make a Stepping Stool (Kid & Adult Friendly)
- 4 Eco-Friendly DIY Tip
- 5 Renter-Friendly Design Hacks
- 6 Creative Uses for Your DIY Stepping Stool
- 7 How to Make a Stepping Stool (Recap)
- 8 FAQs: How to Make a Stepping Stool
- 9 Experts Thoughts: Build It, Step Up, Show Off
- 10 About the Author
Why Make a Stepping Stool Yourself?
Before we pull out the power tools, let’s talk about why. Yes, you can buy one but here’s why you might want to go DIY:
- Save money – Most DIY stools cost under $20 to make.
- Customize the size and style – Perfect for awkward corners or to match your decor.
- Eco-friendly – Use scrap wood or upcycle old furniture parts.
- Safety first – Design it specifically for your needs, whether it’s toddler-sized or sturdy enough for adult use.
- Pride – Nothing beats saying, “Yeah, I built that.”
What You’ll Need (Materials & Tools)
This simple DIY stepping stool requires just a few basic tools and materials. Most can be found at your local hardware store or if you’re like me buried in the back of your garage.
Materials:
- 1×8 or 1×10 wood board (pine is affordable and beginner-friendly)
- Wood screws or pocket-hole screws
- Wood glue
- Sandpaper (120 and 220 grit)
- Wood filler (optional for hiding screw holes)
- Paint or wood stain (optional)
- Felt pads or non-slip rubber feet (especially for tile or hardwood floors)
Tools:
- Drill + drill bits
- Jigsaw or circular saw
- Clamps
- Tape measure
- Pencil
- Screwdriver
- Safety gear (goggles, mask)
Step-by-Step: How to Make a Stepping Stool (Kid & Adult Friendly)
Let’s walk through the process of making a stepping stool from start to finish.
Step 1: Measure & Cut Your Wood
Determine the size of your stool. For a standard two-step stool:
- Top step: 15″ x 8″
- Lower step: 12″ x 8″
- Side supports: 10″ tall, with a slight arch or angle cut for style (optional)
Use a jigsaw or circular saw to cut the pieces. If you’re nervous about using power tools, most big-box stores will cut wood for you bring your measurements.
Read More: How to Style a Round Coffee Table: Expert Tips to Nail the Look
Step 2: Sand Everything Smooth
Nobody wants splinters especially not toddlers. Use 120-grit sandpaper first, then finish with 220-grit sandpaper for a buttery-smooth edge. Round the corners slightly to make it safer for kids.
Step 3: Assemble the Base
Apply wood glue and fasten the side supports to the lower step with screws. Secure the pieces with clamps and allow the glue to set for 20-30 minutes before drilling. Be sure to pre-drill holes to protect the wood from cracking!
A quick tip: Use a square or level to keep everything aligned nothing worse than a wobbly stool!
Step 4: Add the Top Step
Once the base is sturdy, attach the top step. Use the same glue-then-screw method. You can screw from the top down and fill holes with wood filler later or use pocket holes underneath for a cleaner look.
Step 5: Finish with Style
Time to make it yours. You can:
- Give it a pop of color that complements your kitchen or your child’s room.
- Stain it for a rustic farmhouse vibe
- Seal it with polyurethane if it’ll live in the bathroom or kitchen
Don’t forget to add felt pads or rubber feet to the bottom they protect floors and keep things slip-free.
Eco-Friendly DIY Tip
Have leftover wood from another project? A stepping stool is the perfect way to upcycle! You can also look for reclaimed wood at salvage yards or reuse boards from old furniture.
Renter-Friendly Design Hacks
Living in a small space? Try:
- Making a foldable stool with a hinged top
- Adding storage inside the step for toys or cleaning supplies
- Creating a narrow-profile stool for tight bathroom corners
Because DIY should never take up more space than it solves.
Creative Uses for Your DIY Stepping Stool
Your finished stool isn’t just for stepping on. Other clever uses:
- Bedside table for kids’ rooms
- Plant Stand
- Mini bookshelf
- Shoe bench
- Kitchen helper stands for little chefs
How to Make a Stepping Stool (Recap)
In case you scrolled too far while sipping your iced coffee (guilty!), here’s a quick recap:
- Measure and cut your wood (or have it cut for you)
- Sand everything to avoid splinters
- Assemble with glue and screws
- Add the top step
- Paint or stain and add non-slip feet
Voila! Now you know precisely how to create a safe, stylish, and satisfying stepping stool.
Read More: How to Clean Cloth Dining Room Chairs Like a Pro
FAQs: How to Make a Stepping Stool
1. Can I make a stepping stool without power tools?
Yes! You can use hand tools and pre-cut wood. A simple hand saw and screwdriver work just fine for a basic design.
2. Is it safe for kids to use?
Absolutely as long as it’s sturdy, has rounded edges, and includes non-slip grips or rubber feet. You can even add handholds to the sides for extra safety.
3. How much weight can a DIY stool hold?
If built with solid wood and properly screwed together, it can easily support 200–250 lbs. Use thicker wood if you plan to use it as an adult footstool.
4. What’s the best wood for a beginner project?
Pine is a winner it’s soft, inexpensive, and easy to work with. Birch plywood is also excellent for a modern look.
5. Can I paint it with leftover wall paint?
Yes, but make sure to seal it with a clear coat, mainly if it’ll be used in high-traffic areas or cleaned often.
Experts Thoughts: Build It, Step Up, Show Off
Whether you’re making life easier for your mini-me, decorating on a dime, or just tired of doing the countertop climb this simple project has your back (and your toes).
Now that you know how to make a stepping stool from scratch, you’re one small step closer to home improvement greatness. Go ahead step up, DIYer. You’ve got this!